After 17 years of faithful duty providing piping hot water, our hot water heater started leaving puddles around the kitchen. At first we blamed them on the kitchen sink drain. I had to create a more flexible version of this sliding sewer hose many years ago. There has developed a bit of a gap when the slider is retracted but it had not been giving us trouble when extended. We were just not dumping water in the sink when retracted, “Let a sleeping dog lie.”
I had to admit this leak was getting out of hand, so here goes. The first physical task is to remove the dividers under the sink and corner cabinet. Three screws each. Then remove the shelf inside the sink cabinet. A little tougher since you have to convince it that it really wants to “come out.” I crawled in up to my arm pits and slathered a double layer of “Three M 5200” marine sealant around the socket the sewer hose docks in. “5200” is the kind you use if you never ever want it to take it out again.
I rocked back on my heels and admired my work when Judy pronounces, “I saw a drip.” “Where?” “Right under the hot water tank.”
We were able to get a cut off bucket under it. Dump it a couple times a day and you are good to go. “maybe the dog will sleep a while longer.” ”What!” “Just kidding, just kidding.”
Abbreviated Instructions:
This is where things get serious. First call your RV supply house with all the model and serial number data firmly in hand. If you find a replacement water heater, the battle is only half over. Now ask the important question. “How soon can you install it for me?” I was getting answers like “we are scheduled out to the 10th, but I think we could work you in pretty soon after that.”
“O.K. then I will do it myself,” I declare. With some trepidation, Judy agreed to go along with my plan.
We ordered the hot water heater to be delivered to Bish’s RV Store in Pocatello Idaho, 180 miles away. We picked it up about 4:30 next day, Tuesday. I asked if they could do the job, “not before Friday.” I then asked if they knew of a local RV Campground that wouldn’t object to me working on my own coach. Batise Springs RV Park turned out to be ideal. No one complained and we were close to my “Just-in-Time-Inventory” stores Ace Hardware and Bish’s. We optimistically paid for one night. It took two.
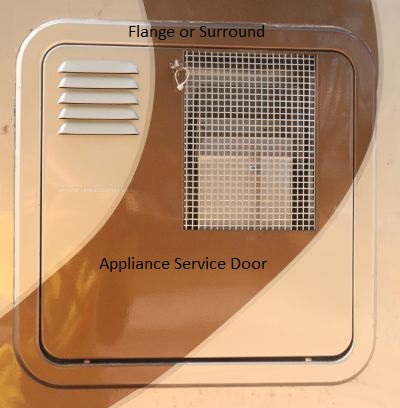
First, our Alpine coach, a 2001 FDDS model, has the water heater under the kitchen counters with a square vent in the side of the coach. It sets on a shelf with no tie-downs, just four screws through the sheet metal “Bell” of the heater into the skin layer of the wall.

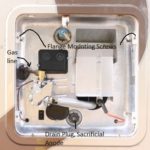


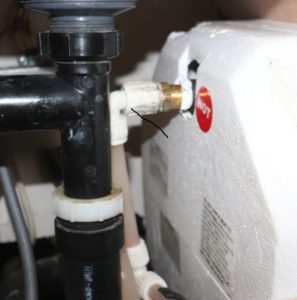
It has a flange or surround trim that slides inside this bell and rests on the outside skin of the coach to make a water tight seal and hold the appliance service door. The water heater is connected to the coach at five points; The hot and cold water connections, the 12 volt D.C. and 120 volt A.C. electrical systems, and the propane gas system. Recognize that the original connectors to the water system are special water tubing to pipe thread connectors. If you screw them up you will find them at the RV supply store. As it is you will probably need the rubber grommets that seal these fittings from the RV Store any way. The hot water fitting is actually a brass check valve. It will need cleaning. The bottom fitting is for cold water and mine was galvanized and badly corroded. I replaced it with a brass ½ inch by 2 inch nipple.
Work carefully and thoughtfully through the disassembly. Don’t bend, fold, staple or mutilate any of the parts you need to reuse. When you get the screws out and the calk cut free the water heater will slide right out into your arms. However as soon as you get the water heater out a few inches you need reach in on the right side of the tank and cut the D.C. wires as close to the tank as is practical. We will splice these to the new water heater D.C. wiring.
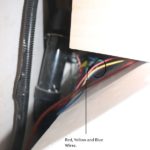
This will be much easier than removing the counter-top to get at the source connectors. Set up the new water heater with the check valve and pipe nipple and slide the new tank most of the way into the hole in the wall. Reach in on the right side of the box and fish out the three D.C. connector wires and the three wire stubs from the old water heater. Connect the colors to their mating colored wires.
Hook up the 120 volt A.C. wires, the water connections and Propane gas tube. Carefully check over your work and finally give it the full pressure test and look for leaks.
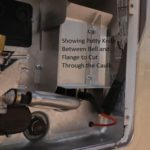
For me the greatest amount of time was consumed getting the caulk peeled away from the sheet metal bell of the water heater. The manufacturer appears to have used a caulk similar to “Three M 5200” marine caulk. (See comments on 5200 above.)
I carefully slipped a rather stiff but flexible putty knife under the trim flange or surround. I worked around and around the trim flange, slipping the putty knife under the flange and cutting to the inner curve. When that was loose all the way around I worked the inside edge of the flange with the putty knife sliding it edge-ways along the joint between the flange and the inside of the water heater bell.
Finally I was able to get my thin wrecking bar under the lip of the flange, slide it all the way to the inside edge of the flange and gently back the flange out of the sheet metal bell without chipping the coache’s paint job. I managed to get the flange away from the outside skin of the coach all of the way around by a sixteenth of an inch. With a thin wood splint as fulcrum I gradually made that an eighth of an inch, a quarter inch and finally out. I had lots of help from Judy.
Now, finally, I could remove the four screws fastened into the wall of the coach. Cut the caulking between the bell of the tank and the wall of the coach.
Putting the new water heater in place went smoothly and quickly. Keeping the D.C. wires leading to the connectors at the far corner of the under cabinet space was a critical decision. It certainly was convenient for the OEM installers, but my arms are not long enough to reach them.
I spent a good hour pulling, twisting and coaxing the copper tubing carrying the propane into the exact shape to fit the flare dead straight over the brass gas fitting on the propane burner. With the gas hooked up I went to give it the old leak test. I turned on the water. I could hear it bubbling into the tank. Or so I thought, until Judy called out where is all this water coming from? Oh the cold water fitting! I guess that I forgot something. I was definitely in the dog house. One good came of this, We were able to hand mop the floor all the way into the bedroom. Thankfully we had gotten rid of the old carpet.
It’s only common sense that you must hook up both the hot and cold water. Sometimes “Common Sense” ain’t so common. Well another adage states that “Common Sense” is developed from lots of “Common Mistakes.” You can be sure I won’t do that again!
To view this blog use the following URL link.
Awesome description of what you had to do…and my sympathies to you on the forgetting the cold water connection…must be a Cook Family thing coming out…hardly two generations from running water…
Thanks for sharing and it reminded me why I was so happy when I sold my Mechanical Contracting company…in two months my hands were as clean as new….happy travels.